Bubble Tea

My software development work is mostly done in a terminal. So I suppose it is
natural that most of my tools are using a command-line
interface. Besides
writing bash scripts, there are situations where I need to write CLI programs
myself from time to time. In my day job of writing enterprise applications,
I almost use C# and JavaScript exclusively. However, when it comes to writing
CLI tools, Go is the language I preferred. There are many CLI frameworks written
in Go but cobra is the one I used most. It is
also a framework used by many tools like kubectl.
cobra itself is a very powerful framework and, combining it with viper and
pflag, it has pretty much all you need in terms of writing a command line
program.
Using arguments or flags with a CLI program makes it easy to automate things.
However, there are times that I will need to handle more complicated
interactions between users and the program. These interactions can be done via
a TUI but cobra
does not have any coverage on it. As you could probably guess by now, Bubble
Tea is the tool which can be
integrated into cobra to allow building a TUI with such interactions.
Bubble Tea is a TUI framework from charm.sh and it does not contain any UI components. It can be used without UI components and developer will have to write the code responsible for rendering and behaviour. Luckily, charm.sh as also provides a set of common UI components in repository Bubbles and it can be used in Bubble Tea programs.
CLI programs which I built with bubbletea usually start with cobra as not
all workflows require a TUI (such as my-app login). Some of the commands
requires a TUI and that is when code will be written to start a bubbletea
program.
An example on command login with cobra.
func runLogin(_ *cobra.Command, _ []string) error {
	token, err := authhelper.GetToken()
	if err != nil {
		return err
	}
	fmt.Println("Login has been completed successfully")
	return nil
}
An example on command list (which is interactive) with cobra.
func runList(_ *cobra.Command, _ []string) error {
  config, err := getOAuthConfigurationFromViper()
  if err != nil {
    return err
  }
  client, err := api.NewClient(config.GetOAuthConfig())
  if err != nil {
    return err
  }
  items, err := client.ListItems()
  if err != nil {
    return err
  }

  columns := getItemColumns()
  rows := getRows(items)

  t := table.New(
    table.WithColumns(columns),
    table.WithRows(rows),
    table.WithFocused(true),
    table.WithHeight(displayRowCount),
  )

  t.SetStyles(getStyles())

  m := tableModel{
    apiClient: client,
    table:     t,
    data:      items,
    tableKeys: tableEventKeys,
    inputKeys: inputEventKeys,
    help:      help.New(),
  }

  if err := bubbleteahelper.SetupLogFile(logFilePath, logFilePrefix); err != nil {
    return err
  }

  if _, err := tea.NewProgram(m).Run(); err != nil {
    return err
  }
  return nil
}
As you can see in the example with command list, although there is a bit setup
work to be done before starting bubbletea, it is no very involved and
relatively easy. The above example retrieves data from an API and populate it
into a table. We setup a table with column headers, data (items), number
of rows to be displayed, key bindings (tableKeys and inputKeys). We also
setup of bubbletea with a log file as we cannot print log lines into
a terminal since bubbletea takes over the whole terminal screen most of the
time. tea.NewProgram(m).Run() returns the final model (which contains states)
being used in bubbletea but we are ignoring it in this example.
One of the nice things with bubbletea is that the architecture (or program
flow) can be easily understood. It uses The Elm
Architecture. The architecture is
mostly used to generate HTML renderings and the data flow is shown below.

(illustration taken from dennisreimann.de)
To start a program tea.NewProgram(m), developer will have to supply a model
and the model m implements the following interface.
type Model interface {
	// Init is the first function that will be called. It returns an optional
	// initial command. To not perform an initial command return nil.
	Init() Cmd

	// Update is called when a message is received. Use it to inspect messages
	// and, in response, update the model and/or send a command.
	Update(Msg) (Model, Cmd)

	// View renders the program's UI, which is just a string. The view is
	// rendered after every Update.
	View() string
}
We can ignore Init() and focus on Update() and View(). Update()
processes input Msg from bubbletea framework (or “Elm Runtime” in the
illustration). Msg is likely an event (such as a key event, a window resize
event or a custom event representing a business event). Update() contains the
logic to process Msg and determines the model Model and command Cmd to be
returned. Model responsible for all things about a UI including states and
behaviour. Therefore, Model returned from Update() represents the next UI to
be presented to the user while Cmd is a function returning a Msg for the
next UI (Model) to be processed in its Update(). Update() has access to
Model and, thus, it is also responsible to update states in Model. View()
will be invoked after Update() and it is responsible for drawing (or writing
characters) to the terminal to create UI required.
An example on Model and its functions.
type dateInputModel struct {
	fieldDescription string
	itemName         string
	input            textinput.Model
	originalText     string
	err              error
	help             help.Model
	keys             inputKeyMap
	parent           tea.Model
}

func (m dateInputModel) Init() tea.Cmd { return nil }

// Update updates the states of the date input
func (m dateInputModel) Update(msg tea.Msg) (tea.Model, tea.Cmd) {
	var cmd tea.Cmd
	var cmds []tea.Cmd

	switch msg := msg.(type) {
	case tea.WindowSizeMsg:
		m.input.SetValue(m.originalText)
		m.input.Focus()
	case tea.KeyMsg:
		switch {
		case key.Matches(msg, m.keys.SaveAndExit):
			cmds = append(cmds, m.patchItem())
		case key.Matches(msg, m.keys.Cancel):
			return m.parent, showTable(nil)
		}
	case recordUpdated:
		return m.parent, showTable(msg.records)
	case errored:
		m.err = msg.err
	}

	m.input, cmd = m.input.Update(msg)
	cmds = append(cmds, cmd)
	return m, tea.Batch(cmds...)
}

// View renders the date input view
func (m dateInputModel) View() string {
	title := fmt.Sprintf("%s of '%s'", m.fieldDescription, m.itemName)
	errorMessage := ""
	if m.err != nil {
		errorMessage = m.err.Error()
	}

	return fmt.Sprintf(
		"%s\n\n%s\n\n%s%s\n",
		title,
		m.input.View(),
		getErrorMessageSection(errorMessage),
		m.help.View(m.keys),
	)
}
As you may be aware dateInputModel from the example above, a Model can
contain multiple bubbles UI components (textinput.Model and help.Model in
the example above) to help with rendering UI in View().
In Update() in the example above, besides it processes business messages
recordUpdated and errored, it also processes key presses via tea.KeyMsg.
As you can see in the switch statement followed, we can define keys to be
handled in the UI. The following example shows how keys can be defined.
import "github.com/charmbracelet/bubbles/key"

func (k inputKeyMap) ShortHelp() []key.Binding {
	return []key.Binding{k.SaveAndExit, k.Cancel}
}

func (k inputKeyMap) FullHelp() [][]key.Binding {
	return [][]key.Binding{k.ShortHelp()}
}

var inputEventKeys = inputKeyMap{
	SaveAndExit: key.NewBinding(
		key.WithKeys("ctrl+s"),
		key.WithHelp("ctrl+s", "save and exit"),
	),
	Cancel: key.NewBinding(
		key.WithKeys("esc", "ctrl+c"),
		key.WithHelp("esc/ctrl+c", "cancel"),
	),
}

type inputKeyMap struct {
	SaveAndExit key.Binding
	Cancel      key.Binding
}
Package key from bubbles provides functionalities required to define keys.
This allows naming of key bindings and assigning multiple keys to the same
binding. It is also a nice feature that this allows defining help message
for a binding.
Table is one of the most
useful UI components is dealing with data. It is easy to setup table by
calling its SetRows() with []Row where Row is just []string. We can also
have key bindings previous example as show below.
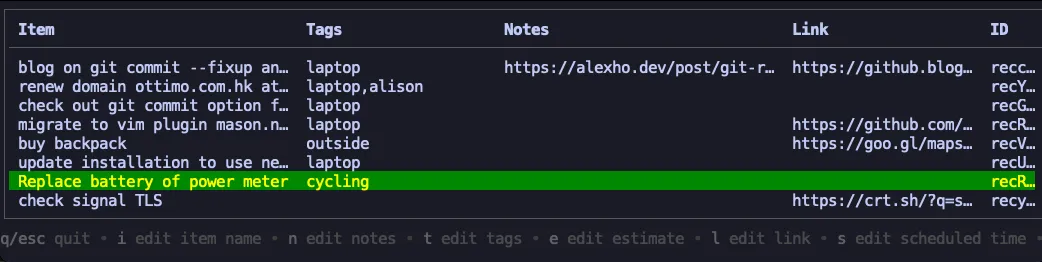
With key bindings, we can provide actions to a table row and it makes
interactions with or changes to a row possible. If you want, it is also possible
to configure a table to allow multiple row selection which allows bulk action on
selected rows. Table has a viewport included and that means height could be
set to a table and, if not all rows of data fit into the table, scrolling will
be enabled and it is a very nice UX.
List is an UI component handling a number of items well. Each item can have its name and description.
Filtering on items before selection/de-selection is also possible. Each item in
a list has to satisfy Item interface includes FilterValue() returning
a string so that the list can use that value for filtering.
type Item interface {
	// Filter value is the value we use when filtering against this item when
	// we're filtering the list.
	FilterValue() string
}
// an implementation example
func (i listItem) FilterValue() string { return i.title }
Toggling of an item in a multi-select list can be done by adding
a DefaultDelegate. (The following example does not allow toggling when
multi-select is not enabled.)
type listSelectModel struct {
	fieldDescription   string
	originalSelections []string
	selections         []string
	multiSelect        bool
	itemName           string
	list               list.Model
	help               help.Model
	itemKeys           listMultiItemKeyMap
}

type listMultiItemKeyMap struct {
	ToggleSelection key.Binding
}

func newListSelectModel(fieldDescription string, originalSelections []string, selections []string, multiSelect bool, item string) listSelectModel {
	delegate := newListItemDelegate(listMultiItemEventKeys, multiSelect)
	newList := list.New(getListItems(selections, originalSelections), delegate, 0, 0)
	newList.Title = fmt.Sprintf("%s of '%s'", fieldDescription, item)
	return listSelectModel{
		fieldDescription:   fieldDescription,
		originalSelections: originalSelections,
		selections:         selections,
		multiSelect:        multiSelect,
		itemName:           item,
		list:               newList,
		help:               help.New(),
		itemKeys:           listMultiItemEventKeys,
	}
}

func newListItemDelegate(keys listMultiItemKeyMap, multiSelect bool) list.DefaultDelegate {
	d := list.NewDefaultDelegate()

	if !multiSelect {
		return d
	}

	d.UpdateFunc = func(msg tea.Msg, m *list.Model) tea.Cmd {
		switch msg := msg.(type) {
		case tea.KeyMsg:
			switch {
			case key.Matches(msg, keys.ToggleSelection):
				if i, ok := m.SelectedItem().(listItem); ok {
					i.selected = !i.selected
					return m.SetItem(m.Index(), i)
				}
				return nil
			}
		}
		return nil
	}

	d.ShortHelpFunc = func() []key.Binding { return keys.ShortHelp() }
	d.FullHelpFunc = func() [][]key.Binding { return keys.FullHelp() }

	return d
}
There are many UI components from
bubbles which we still have not
explored here. I hope this gives a rough idea of what bubbletea and bubbles
could do in writing CLI programs. If you want to learn more about it or products
from charm.sh visit charm.sh on
YouTube.
I hope I will have time later to showcase more usages of the libraries. Until then, happy coding!